RealSense 學習筆記/教學/分享(二):裝置控制
有些人問我 明明工作看起來也不錯 薪水 環境都不錯 為什麼我還在找?
先看看以下影片
這是去年的發表,當辦公室仍在用2000或是更久以前的方法 花許多時間/人力/眼力的同時
這樣的算法已經準備隨時取代掉這些工作了
你說我會不會怕? 當然會,所以要找能夠更未來性的工作 而不是在這樣養老的小鎮 已暫時的安穩而滿足,必須更向前啊!
那就來到第二篇,有的第一個感測深度之後,進入裝置控制篇
上一篇是讓pipeline啟動,然後成功使用相機
第一步就是架設一個pipeline
而這邊,就是在pipeline啟動後,相機獲取畫面前的控制與動作
有了 rs.pipeline 後
下一個有pipeline_profile,我目前還沒有用到
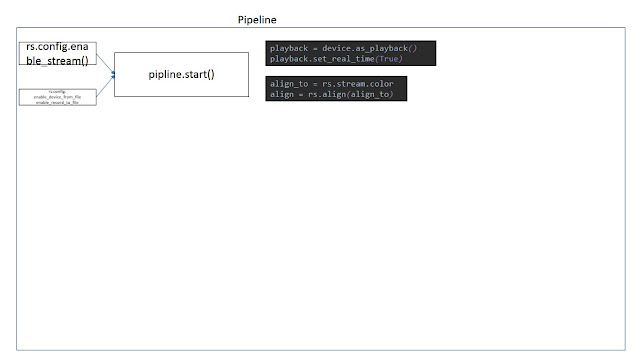
在pipeline.start()可以加入 rs.config()
首先是在viewer裡面的選項,preset 幾個預設的模式選擇,而我這邊需要的是Highdensity 讓畫面中像素密度最高
我在這裡直接用代碼4,雖然Intel那邊的負責人Dorodnic 有說這個編號會一直換,不過可能是在升級韌體或是相機間的差異吧,至少同一台我使用的時候沒有變過,就直接用4
他在github有發一個loop過所有模式 然後又preset name決定選哪個的程式碼
device = profile.get_device()
depth_sensor = device.first_depth_sensor()
depth_sensor.set_option(rs.option.visual_preset, 4)
dev_range = depth_sensor.get_option_range(rs.option.visual_preset)
preset_name = depth_sensor.get_option_value_description(rs.option.visual_preset, 4)
其他選項可以在viewer裡面看到
然後可見光相機有關掉自動曝光的選項,這個動作可以減少處理時間讓兩個串流的幀更同步
不過我在室外要使用的話,勢必無法用這個方法來避免落幀
color_sensor = profile.get_device().query_sensors()[1]
color_sensor.set_option(rs.option.enable_auto_exposure, 0)
color_sensor.set_option(rs.option.exposure,100)
4/24 更新
原來還有一個選項叫做曝光優先的選項,如果把它關掉,就會以保持畫面流暢優先於每幀的曝光
color_sensor = profile.get_device().query_sensors()[1]
color_sensor.set_option(rs.option.auto_exposure_priority,False)
原來我在打開錄製到關掉錄製的時間內他因為沒有獲取完整的曝光而沒有儲存
這個選項就會以儲存為優先
recorder = device.as_recorder()
pause = rs.recorder.pause(recorder)
playback = device.as_playback()
playback.set_real_time(False)
playback.pause()
playback.resume()
recorder 主要就是 pause, resume 兩個動作
depth_stream = profile.get_stream(rs.stream.depth)
inst = rs.video_stream_profile.intrinsics
#get intrinsics of the frames
depth_intrin = depth_frame.profile.as_video_stream_profile().intrinsics
color_intrin = color_frame.profile.as_video_stream_profile().intrinsics
depth_to_color_extrin = depth_frame.profile.get_extrinsics_to(color_frame.profile)
主要我是需要depth_intrin/color_intrin來把像素上的x,y投影到3D的x,y,z
在沒有把兩個影像疊合的情況下會有誤差,接下來用align功能後兩個就會疊在一起
得到一樣的數值
-----------------------------------------------------------------------------------------------------------------
到這就是在接下來wait_for_frames前的設置
這篇沒有放範例 因為是通用在接下來的應用裡面
經過很多的測試才得到的結果
然後基本上都是github上面有的拿起來拼湊的
接下來就是幀的接收、顯示
不過目前的落幀問題還是無法解決,我不需要及時大量的資料,只需要準確的獲取一幀
然後要深度 彩色都獲得
有待解決
先看看以下影片
這是去年的發表,當辦公室仍在用2000或是更久以前的方法 花許多時間/人力/眼力的同時
這樣的算法已經準備隨時取代掉這些工作了
你說我會不會怕? 當然會,所以要找能夠更未來性的工作 而不是在這樣養老的小鎮 已暫時的安穩而滿足,必須更向前啊!
那就來到第二篇,有的第一個感測深度之後,進入裝置控制篇
上一篇是讓pipeline啟動,然後成功使用相機
第一步就是架設一個pipeline
而這邊,就是在pipeline啟動後,相機獲取畫面前的控制與動作
有了 rs.pipeline 後
下一個有pipeline_profile,我目前還沒有用到
在pipeline.start()可以加入 rs.config()
enable_stream
|
在這裡輸入深度/彩色/紅外線以及解析度,FPS
|
enable_all_streams
|
打開全部可以打開的串流,我多在讀取的時候使用
|
enable_device
|
當有幾個裝置的時候輸入裝置的編號
|
enable_device_from_file
|
(“filename”,True/False) 在這裡輸入的檔名 然後true/false決定重播與否
|
enable_record_to_file
|
(“filename.bag”) 儲存的檔名
|
disable_stream
|
(“stream”,”index”) 關掉串流
|
disable_all_streams
| 關掉全部串流 |
resolve
| |
can_resolve
|
Sensor 感測器
首先是在viewer裡面的選項,preset 幾個預設的模式選擇,而我這邊需要的是Highdensity 讓畫面中像素密度最高
我在這裡直接用代碼4,雖然Intel那邊的負責人Dorodnic 有說這個編號會一直換,不過可能是在升級韌體或是相機間的差異吧,至少同一台我使用的時候沒有變過,就直接用4
他在github有發一個loop過所有模式 然後又preset name決定選哪個的程式碼
device = profile.get_device()
depth_sensor = device.first_depth_sensor()
depth_sensor.set_option(rs.option.visual_preset, 4)
dev_range = depth_sensor.get_option_range(rs.option.visual_preset)
preset_name = depth_sensor.get_option_value_description(rs.option.visual_preset, 4)
其他選項可以在viewer裡面看到
然後可見光相機有關掉自動曝光的選項,這個動作可以減少處理時間讓兩個串流的幀更同步
不過我在室外要使用的話,勢必無法用這個方法來避免落幀
color_sensor = profile.get_device().query_sensors()[1]
color_sensor.set_option(rs.option.enable_auto_exposure, 0)
color_sensor.set_option(rs.option.exposure,100)
4/24 更新
原來還有一個選項叫做曝光優先的選項,如果把它關掉,就會以保持畫面流暢優先於每幀的曝光
color_sensor = profile.get_device().query_sensors()[1]
color_sensor.set_option(rs.option.auto_exposure_priority,False)
原來我在打開錄製到關掉錄製的時間內他因為沒有獲取完整的曝光而沒有儲存
這個選項就會以儲存為優先
Recorder & Playback 錄製與重播
recorder = device.as_recorder()
pause = rs.recorder.pause(recorder)
playback = device.as_playback()
playback.set_real_time(False)
playback.pause()
playback.resume()
recorder 主要就是 pause, resume 兩個動作
pause
|
pause/resume在處理的時候很慢很卡 而且也沒有需要 所以後來也沒有使用
|
resume
| |
file_name
|
回傳這段影像的基礎屬性
|
get_position
| |
get_duration
| |
is_real_time
| 回到及時時間 |
set_real_time
|
set_real_time 是影像即時性,如果暫停在一個畫面 重播時間會繼續跑,False才可以一偵一偵的檢驗
|
config.enable_record_to_file(file_name)
|
這個應該是在開啟影像的同時可以錄製在另外一個影像,因為
rs.config.enable_device_from_file(config, '123.bag')
跟config.enable_record_to_file(file_name)
兩個並不能同時使用
|
current_status
| 回傳現在狀態 |
Intrinsic/Extrinsic 內積外積屬性
這個其實怎麼翻譯我不太確定,就是一些串流的數值depth_stream = profile.get_stream(rs.stream.depth)
inst = rs.video_stream_profile.intrinsics
#get intrinsics of the frames
depth_intrin = depth_frame.profile.as_video_stream_profile().intrinsics
color_intrin = color_frame.profile.as_video_stream_profile().intrinsics
depth_to_color_extrin = depth_frame.profile.get_extrinsics_to(color_frame.profile)
主要我是需要depth_intrin/color_intrin來把像素上的x,y投影到3D的x,y,z
在沒有把兩個影像疊合的情況下會有誤差,接下來用align功能後兩個就會疊在一起
得到一樣的數值
-----------------------------------------------------------------------------------------------------------------
到這就是在接下來wait_for_frames前的設置
這篇沒有放範例 因為是通用在接下來的應用裡面
經過很多的測試才得到的結果
然後基本上都是github上面有的拿起來拼湊的
接下來就是幀的接收、顯示
不過目前的落幀問題還是無法解決,我不需要及時大量的資料,只需要準確的獲取一幀
然後要深度 彩色都獲得
有待解決


Comments
Post a Comment