Using Smart Editor to create a survey form in ArcGIS Online
The previous article is a summary and comparison of the option in ArcGIS Online
This part will focus on the settings of the Smart Editor.
The online tutorials shown that some would require a standard license, but it is actually achievable with basic license, with the rest settings online.
The first step is to create the feature class to store the survey.
Simply use create new feature class, Smart Editor support point, line, and polygon.
To create a drop list by using domains, here won't cover how to set a domain, but just a quick hint, database>properties.
To make one field is required, make Enable NULL Value option to no. There is one limitation, that it can only be set when creating a new field, and also the feature class can not have any objects. this can't be changed after wards, also not changeable in ArcGIS Online
A placeholder can be set with default value, in my case I set:
I accept data protection to first none, they need to manually switch it to yes
and
in the comments column, set with max 1000 characters.
Creating more Feature classes with the same attribute is also easy, just use import when creating a feature class, all settings include default value, nullable will be imported.

After the feature layer is set, publish it as a service
the setting here is:
Feature Access but not Tiling.
To keep the data safe, allow only add new feature, no update or delete

After uploaded, it will be the settings in AGOL
one issue found is that attributes can still be seen in smart editor, so others name and email can't be really hidden, we will have few extra steps to avoid it
the important settings here is
activate edit
allow only add features
Features not visible

then switch back to overview tab
I set three features: point, polyline. polygon with same attributes in this Feature. but the features are not available to the public. We want to show that there's really opinions from others, but hiding the detailed comments, we need to create a hosted feature layer views. Pop-ups can be set in the newly created view layer, in the visualization tab.

then prepare the webmap, add the both view layer and feature layer, and all the other layers and settings preferred.

while the Webmap is set as your wish, now its time to create an app, with the Web AppBuilder

The design, map set as your preference, this part will skip to the Widget, check the layers you want at Editor, and in the description, html scripts can be put and shown

and in actions, attributes can be shown but not viewable, but not hidden but editable.

there can be more field-based action added.
Intersection: same as spatial join in ArcMap
Address and Coordination are location systematic data
And preset can save the users some time, in our case is the Name & Email, when a user wants to submit multiple comments, it can be used. Another benefit for this function, is that it applies to all layers with the same field name, so all my three layers can share this benefit without showing multiple inputs.
Using the hide/required actions can be used to create relations between questions, for example: comment type is Others, then the Specify field can be made necessary

 The attribute actions are set here
there are more editing in the Widget, this can set a template for the templates fields mentions. In our case Name and Email of course is different for all users, but other properties can be set here. And the description here is also available for html styling.
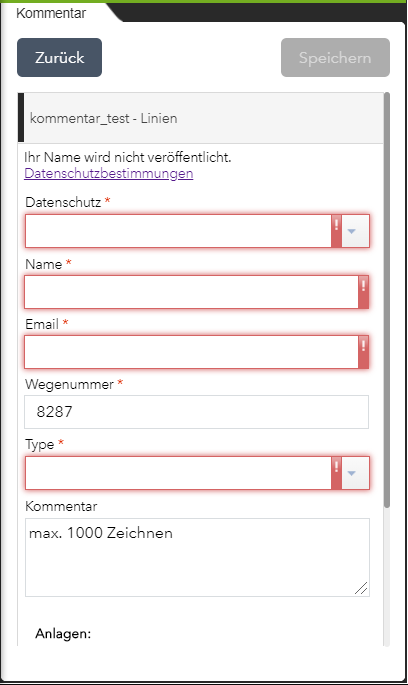
 the eventual form can be view as here
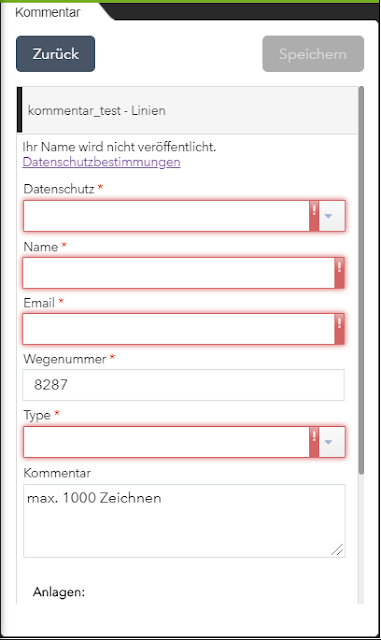
So we got a formatted survey widget into our app, hooray!
Remember I mentioned about hosted view layer? if not created and added, either you won't see any comments as an anonymous user, or you will be able to sneak onto others complete input data depends on your setting of the feature layer.
So that would be the method to create a survey for our Web App!
other articles covering Survey123, App-Templates will come out soon!
This part will focus on the settings of the Smart Editor.
The online tutorials shown that some would require a standard license, but it is actually achievable with basic license, with the rest settings online.
The first step is to create the feature class to store the survey.
Simply use create new feature class, Smart Editor support point, line, and polygon.
To create a drop list by using domains, here won't cover how to set a domain, but just a quick hint, database>properties.
To make one field is required, make Enable NULL Value option to no. There is one limitation, that it can only be set when creating a new field, and also the feature class can not have any objects. this can't be changed after wards, also not changeable in ArcGIS Online
A placeholder can be set with default value, in my case I set:
I accept data protection to first none, they need to manually switch it to yes
and
in the comments column, set with max 1000 characters.
Creating more Feature classes with the same attribute is also easy, just use import when creating a feature class, all settings include default value, nullable will be imported.

After the feature layer is set, publish it as a service
the setting here is:
Feature Access but not Tiling.
To keep the data safe, allow only add new feature, no update or delete

After uploaded, it will be the settings in AGOL
one issue found is that attributes can still be seen in smart editor, so others name and email can't be really hidden, we will have few extra steps to avoid it
the important settings here is
activate edit
allow only add features
Features not visible

then switch back to overview tab
I set three features: point, polyline. polygon with same attributes in this Feature. but the features are not available to the public. We want to show that there's really opinions from others, but hiding the detailed comments, we need to create a hosted feature layer views. Pop-ups can be set in the newly created view layer, in the visualization tab.

then prepare the webmap, add the both view layer and feature layer, and all the other layers and settings preferred.

while the Webmap is set as your wish, now its time to create an app, with the Web AppBuilder

The design, map set as your preference, this part will skip to the Widget, check the layers you want at Editor, and in the description, html scripts can be put and shown

and in actions, attributes can be shown but not viewable, but not hidden but editable.

there can be more field-based action added.
Intersection: same as spatial join in ArcMap
Address and Coordination are location systematic data
And preset can save the users some time, in our case is the Name & Email, when a user wants to submit multiple comments, it can be used. Another benefit for this function, is that it applies to all layers with the same field name, so all my three layers can share this benefit without showing multiple inputs.
Using the hide/required actions can be used to create relations between questions, for example: comment type is Others, then the Specify field can be made necessary


there are more editing in the Widget, this can set a template for the templates fields mentions. In our case Name and Email of course is different for all users, but other properties can be set here. And the description here is also available for html styling.

So we got a formatted survey widget into our app, hooray!
Remember I mentioned about hosted view layer? if not created and added, either you won't see any comments as an anonymous user, or you will be able to sneak onto others complete input data depends on your setting of the feature layer.
So that would be the method to create a survey for our Web App!
other articles covering Survey123, App-Templates will come out soon!


Comments
Post a Comment