Raspberry Pi - start without HDMI adapter
So, after the "mind blowing" fair we went in Stuttgart, we started to push something new
The thing is what I've been saying for a long time: Raspberry Pi 4
As currently the adapter is not here yet, I tried to start without it connecting to hdmi directly
I did some research and found a lot of methods, wireless method hasn't succeed
So, what I did on my first day of Raspberry Pi
though the distributor has put a NOOB in the SD card which came with the pi, I decided to try from step one on another SD card
So go download Raspbian at https://www.raspberrypi.org/downloads/raspbian/
I use the one with recommended software, for more conveniency

and I saw either people use Rufus or Etcher to install, I used Rufus while I was installing Ubuntu, so I tried Etcher this time.
It is quite intuitive, just get the .zip I just downloaded, and then it will almost autmoatically find the SD card available for install, then just flash it!

After flashing, the system is ready, if there is a micro-HDMI to HDMI adapter, it can be straight connected to screen, mouse, and keyboard.
So two softwares are required for this step: PUTTY and Xming
in the SD card first create a new file called ssh without any extentions

the first step can test if it is working
connect Pi to PC with Ethernet cable, and then use call the command line
type in ipconfig /all to get all the connected port

our Pi will be at Ethernet adapter Ethernet, ip will be shown at Autoconfiguration IPv4 Address

FYI. the PCs connected to this PC will be always be in 169.254.xxx.xxx
then go back and turn off Raspberry Pi, open the cmdline.txt in the SD card
put in ip=169.254.xxx.xxx at the end of the line
then we can put the SD card back in, turn on Pi
Next step is turn on Putty, and connect with the IP address
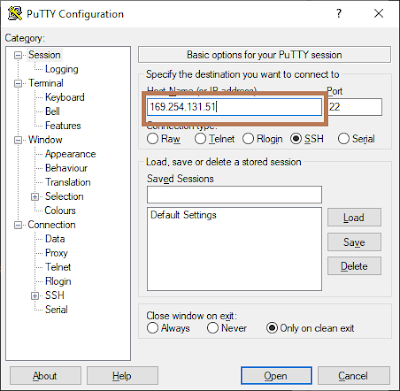

when the window opened, log in
default is
user: pi
password: raspberry
then the terminal is here!

for GUI, type startlxde, then we have our pi on our PC!

That is my first day of Raspberry Pi, next step will let it run my realsense script!
-------------------------------------------------------------------------------------------------------------------------
On day two, I found that the ip address changes, which i will need to repeate the process everytime I reconnect pi.
Also connecting all the messy cables in 2019 is kind of dumb.
So I looked into wireless options, and followed these two:
Official document: https://www.raspberrypi.org/documentation/configuration/wireless/wireless-cli.md
And a tutorial
Before connecting to wifi, the thing is that the terminal don't like underscore(_) and space
My wifi name is FRITZ!Box 7490, therefore it can't be used, so I created a hotspot from my PC
 And then follow the instructions
first use sudo raspi-config to connect to hot spot
 then get the sudo iwlist wlan0 scan
This is to check if the connection is valid
 Then in the official document is kind of hard coding it
with sudo nano /etc/wpa_supplicant/wpa_supplicant.conf will edit the .config file
or the automatic way used in the video is sudo wpa_passphrase "SSID" "password"| sudo tee -a etc/wpa_supplicant/wpa_supplicant.conf

The thing is what I've been saying for a long time: Raspberry Pi 4
As currently the adapter is not here yet, I tried to start without it connecting to hdmi directly
I did some research and found a lot of methods, wireless method hasn't succeed
So, what I did on my first day of Raspberry Pi
Install Rasbian
though the distributor has put a NOOB in the SD card which came with the pi, I decided to try from step one on another SD card
So go download Raspbian at https://www.raspberrypi.org/downloads/raspbian/
I use the one with recommended software, for more conveniency

and I saw either people use Rufus or Etcher to install, I used Rufus while I was installing Ubuntu, so I tried Etcher this time.
It is quite intuitive, just get the .zip I just downloaded, and then it will almost autmoatically find the SD card available for install, then just flash it!

After flashing, the system is ready, if there is a micro-HDMI to HDMI adapter, it can be straight connected to screen, mouse, and keyboard.
Connect to PC
So two softwares are required for this step: PUTTY and Xming
in the SD card first create a new file called ssh without any extentions

the first step can test if it is working
connect Pi to PC with Ethernet cable, and then use call the command line
type in ipconfig /all to get all the connected port

our Pi will be at Ethernet adapter Ethernet, ip will be shown at Autoconfiguration IPv4 Address

FYI. the PCs connected to this PC will be always be in 169.254.xxx.xxx
then go back and turn off Raspberry Pi, open the cmdline.txt in the SD card
put in ip=169.254.xxx.xxx at the end of the line
then we can put the SD card back in, turn on Pi
Next step is turn on Putty, and connect with the IP address


when the window opened, log in
default is
user: pi
password: raspberry
then the terminal is here!

for GUI, type startlxde, then we have our pi on our PC!

That is my first day of Raspberry Pi, next step will let it run my realsense script!
-------------------------------------------------------------------------------------------------------------------------
Wireless connection
On day two, I found that the ip address changes, which i will need to repeate the process everytime I reconnect pi.
Also connecting all the messy cables in 2019 is kind of dumb.
So I looked into wireless options, and followed these two:
Official document: https://www.raspberrypi.org/documentation/configuration/wireless/wireless-cli.md
And a tutorial
Before connecting to wifi, the thing is that the terminal don't like underscore(_) and space
My wifi name is FRITZ!Box 7490, therefore it can't be used, so I created a hotspot from my PC

first use sudo raspi-config to connect to hot spot

This is to check if the connection is valid

with sudo nano /etc/wpa_supplicant/wpa_supplicant.conf will edit the .config file
or the automatic way used in the video is sudo wpa_passphrase "SSID" "password"| sudo tee -a etc/wpa_supplicant/wpa_supplicant.conf
(also written in the document)
the video editted the conf file to hide the password, I skipped this step.
then the last step is to get the ip address
with sudo wpa_cli -i wlan0 reconfigure and then ifconfig wlan0
now the ip address will be shown

Then just open a new session on PuTTy, when the login shows up, succeed!


Comments
Post a Comment